Connect to WiFi - V3
Before you connect your monitor to Wi-Fi, here is some important information to consider:
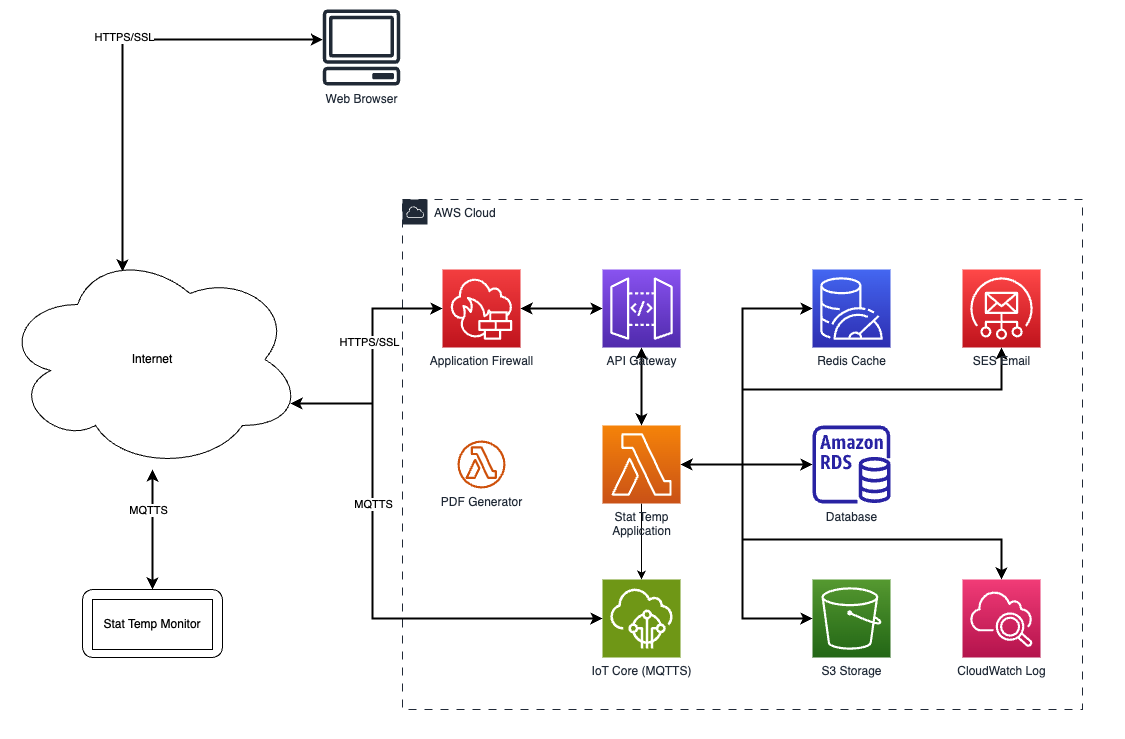
- Ensure port 443 (HTTPS) is open.
- Ensure DNS resolution is not blocked for *.stat-temp.com.
- Stat Temp Wi-Fi devices support 2.4 GHz networks only and will not connect to 5 GHz.
- If band steering is enabled, it may need to be disabled for the device network.
-
Captive portals or login pages can prevent devices from authenticating and will require IT involvement to bypass.
Allow TCP port 8883 outbound (MQTT over SSL) to the following:
- Host: iot.stattemp.io
- AWS endpoint: a2d9b7364deag5-ats.iot.us-east-1.amazonaws.com
- IP addresses: 54.173.251.106, 3.221.75.93
- Allow port 123 (NTP) to pool.ntp.org for time synchronization.
- Avoid deep packet inspection or SSL termination that interferes with encrypted cloud traffic.
- If a proxy server is in use, configure exceptions for Stat Temp domains.
Set Up Your Device
- Unbox your Stat Temp monitor and sensor(s).
- Place the sensor in its desired location.
- Plug the device into power with the supplied power cord.
- Turn the device on by sliding the power switch into the up position.
- The monitor should have a QR code with "Let's Connect to WiFi" display.
Connect To Wi-Fi
As the monitor is connecting, you will see a status bar showing you exactly what is going on, so you get to follow along!
- Download the app ESP BLE Prov
- iOS - ESP BLE Provisioning
- Android - ESP BLE Provisioning
-
Open the ESP BLE Prov app on your phone and tap ‘Provision Device’.
Grant permissions when prompted:
- Allow camera access to scan the QR code.
- Allow Bluetooth access to pair with the monitor.
- Scan the QR code displayed on your monitor using your phone.
-
Tap ‘Pair’ to connect to the monitor via Bluetooth.
A list of available Wi-Fi networks will appear.
- Select your network and enter the password.
- If your network is hidden or not listed, tap “Join Other Network” to enter the details manually.
- Tap ‘Provision’ to begin the connection process.
- Once provisioning is complete, tap ‘OK’.
The monitor will automatically restart and take its first reading. This could take up to 3 minutes.
Advanced Wi-Fi Configuration
Our Stat Temp hardware allows for an alternative method of network provisioning that does not require a separate application. This method is specifically useful in the following circumstances:
- IP information must be manually configured
- The wireless network utilizes Enterprise authentication/encryption
- Connecting to a hidden network that is not broadcasting its SSID.
- You have a large number of devices you are deploying
Wi-Fi Connection Troubleshooting
If you encounter any issues connecting your device to WiFi, please refer to the table below for troubleshooting assistance.
App & Setup Errors
If you encounter any errors while using the ESP BLE Prov app, please refer to the table below.
| Issue | Symptom | Recommended Action |
|---|---|---|
| App Error - Device could not be scanned. Please try again. | QR code not recognized |
Close and reopen the app. If still stuck, perform a pinhole reset on the monitor. To perform a pinhole reset, insert a paperclip into the top pinhole on the right, push in, and release. |
| App Error - Failed to get device version information with error: Encryption is insufficient. | QR code cannot be scanned | When this error occurs, it means that the device you are using will no longer work to connect to Wi-Fi. The quickest way to get connected is to download the app on a different device. |
| App Error - Security applied for communicating with device does not match configuration setting | QR code cannot be scanned |
Delete and reinstall the ESP BLE Prov app. If needed, restart the phone:
|
Network Errors
If you have successfully used the app, but the device is still not connected to your network, then refer to the table below.
| Issue | Symptom | Recommended Action |
|---|---|---|
| Can’t find or connect to the network | No Wi-Fi bars or an exclamation mark next to the bars. |
If this is the first time you are connecting a monitor to WiFi, perform a factory reset, then try to reconnect. If your monitor was previously connected, then the wifi settings may have changed. Reset your wifi and then reconnect. Still offline? Contact IT or email stattemp@gohcl.com. |
| Can’t connect to the AWS cloud server | Wi-Fi bars are visible, but no cloud icon or an exclamation mark in the cloud. |
The device is connected to the network but cannot access the cloud. This could mean that there are restrictions on the network. Please send your MAC address and Stat Temp Technical Specifications to your IT department and email stattemp@gohcl.com for assistance. |
| Monitor not connected to the website | Welcome error with directions to add a monitor. | Add the monitor to your website and then turn it off, and then turn it back on. Create Monitor |
WiFi Specs and Network Connection Diagram
Features
- Single Band 2.4GHz 802.11b/g/n
- Wireless data transfer rates up to 150 Mbps
- What networks are supported? Open, WEP, WPA, WPA2, WPA2 Enterprise
- 802.11 b/g/n • 802.11 n MCS0-7 in both 20 MHz and 40 MHz bandwidth • 802.11 n MCS32 (RX) • 802.11 n 0.4 µs guard-interval • up to 150 Mbps of data rate • Receiving STBC 2×1 • Up to 20.5 dBm of transmitting power